
Projects
Reference fileAI Formula Onboarding Manual
A long-form onboarding manual for the AI Formula robotics platform, workflows, and references.
Overview and resource vaultIntro text, repositories, and attachment downloads from the overview Markdown file.
Reference Vault Files, repositories, and cited handoff material This foldable panel keeps repositories, PDFs, and handoff files beside the handbook that cites them.
Official Repositories
Use these repository cards when you need baseline source context or Sophia-side extensions behind the manual.
Attachments
Add new cited files here so the manual keeps one consistent reference area.
This document is the project manual for the AI Formula Team of the Control Engineering Lab at Sophia University. Its goal is to help a new team member become productive quickly, understand the system shape, and operate the project safely. It is not a full robotics textbook, and it is not intended to teach vehicle design from first principles.
The content in this part focuses on:
- understanding the project and starting your own work
- what a beginner should do first
- the organization and integration of Honda baseline components and Sophia-developed software
- experimental safety and operating rules
- independent study and the official documentation worth keeping open while working
Chapter 00. IntroductionAI Formula manual chapter 0.
0.1 Purpose and Intended Readers
This manual is intended to help new AI Formula team members get started quickly. It provides a clear learning path for understanding the project structure, studying the existing codebase, and gradually developing their own research based on the current system.
It is mainly written for new members of the Sophia University AI Formula team, especially students who are beginning to work with the platform and need a practical guide to the overall project and its software structure.
This manual is intended only as an introductory guide for AI Formula team members. It focuses on basic understanding and initial onboarding, and does not cover advanced topics in depth. 1
0.2 Recommended Learning Path
The recommended learning path for new team members is as follows:
- Understand the purpose and overall structure of the AI Formula project.
- Learn the basic ROS 2 development workflow and framework.
- Learn the basic operation of the AI Formula robot (starting from simple operations such as system startup and vehicle movement).
- Study the existing AI Formula codebase, including both Honda and Sophia components (focusing on the overall role of each part and the ROS 2 topic connections between them, while ignoring the algorithm details at this stage).
- Independently complete a small end-to-end task (or choose another suitable topic) involving code building, running, debugging, and basic practice.
0.3 Other Notes
In this manual, package names are written in monospace, for example launchers or trajectory_follower.
Command examples are written in code blocks:
ros2 topic listPlaceholder values use angle brackets:
cd <aiformula-workspace>This manual avoids machine-specific absolute paths. You should substitute your own workspace locations where needed.
If you need to modify the AI Formula codebase, especially the existing workspaces, please inform Zheng, Yu, or Zhou in advance.
If replacement or major modification is necessary, make sure to create a backup of the original code before making changes. For backup naming, please follow the naming rules described later in the experimental guidelines. A simple example is shown here: if the original folder or file is road_detector, it can be archived as road_detector_old_20260409. Similar naming can be used in other cases as long as the original target and the backup date are clearly indicated.
The following official references are recommended when learning ROS 2:
- ROS 2 workspace tutorial: Creating a workspace
- ROS 2 node concepts: Understanding nodes
- ROS 2 topic concepts: Understanding topics
- ROS 2 parameters: Understanding parameters
- ROS 2 launch: Launching nodes
- ROS 2 TF: About tf2
- Colcon build tool: Quick start
One important practical note: the project is built around ROS 2 Foxy on Ubuntu 20.04, but Foxy is already marked as end-of-life in the official ROS 2 documentation. That means you should prioritize compatibility with the existing project over upgrading everything unless the team explicitly decides to migrate.
Chapter 11. Project OverviewAI Formula manual chapter 1.
1.1 What AI Formula Is
AI Formula is a robotics challenge centered on autonomous driving in a constrained race-style environment. In practical terms, the AI Formula robot is a front-wheel-driven three-wheeled robotic vehicle platform equipped with:
- multiple sensors (such as cameras, odometry, and wheel-speed sensing)
- an onboard GPU computing unit (Jetson)
- a ROS 2 software system for integration, communication, and runtime control
- a vehicle chassis and electrical control interface based on the CAN bus
This project is built on two main Sophia workspaces. The aiformula workspace provides the baseline ROS 2 system integration for the vehicle platform, while the pid_ws workspace adds Sophia-developed trajectory-following logic and related controller implementations.
1.2 Current Research Directions of the Sophia Team
The Sophia team is currently working on several research and development topics related to autonomous driving on the AI Formula platform. The main directions include:
- perception and scene understanding (YOLOP, YOLOPv2, end-to-end methods)
- obstacle detection and avoidance path planning (YOLOv8, B-spline methods)
- path-following control (Lyapunov-based methods)
- optimization algorithms for controller tuning and performance improvement (Bayesian optimization)
- simulation-based experiments and testing (Unity environment)
- robot kinematic modeling
These directions cover both practical system development and research-oriented experimentation on the AI Formula robot.
If you are interested in physical sensors, CAN communication, or robot hardware modification, you are also very welcome to discuss, learn, and practice these topics with the team.
1.3 Learning Goals for New Team Members
By the end of the first onboarding stage, a new team member should be able to:
- gain basic working knowledge of Linux and ROS 2 for future code development
- read and understand Python or C++ code at a basic level
- understand the locations and overall functions of the existing packages (including both Honda and Sophia packages)
- understand the publish–subscribe relationships between major ROS 2 topics
1.4 Quick Reference Guide
To help new team members understand the overall system flow, a simplified topic-level overview of AI Formula is shown below.
Simplified Topic Flow of AI Formula
sensors (camera)
→ perception (road_detector → lane_line_publisher)
→ obstacle_avoidance
→ lane_points
→ trajectory_follower
→ motor_controller
→ CAN bus
The following points provide a quick reference based on the current task or issue.
- If the issue is related to physical I/O, sensors, CAN communication, or hardware interfaces, start from the hardware-related packages in
aiformula. - If the issue is related to launch structure or system startup, start from
launchers. - If the issue is related to perception or lane data, start from the corresponding software-related packages in
aiformula. - If the issue is related to trajectory following or controller behavior, start from
pid_ws.
The following example shows a typical startup flow of the project in practice, based on the official project workflow.
# Source ROS 2 first
source /opt/ros/foxy/setup.bash

# Build and source the baseline workspace
cd <aiformula-workspace>
colcon build --symlink-install
source install/local_setup.bash

# Bring up sensors and CAN
./init_sensors.sh

# Launch the baseline stack
ros2 launch launchers all_nodes.launch.py
Later, depending on the experiment, Sophia-side software can be added on top of the running baseline system:
# Example controller-side run
cd <pid-workspace>
colcon build --symlink-install
source install/local_setup.bash

ros2 run trajectory_follower lya_follower_connected_omegat_global
The basic workflow of this project is to first bring up the platform and baseline system, and then add Sophia-developed software according to the experiment or development task.
Chapter 22. Essential ROS 2 ConceptsAI Formula manual chapter 2.
2.1 ROS 2 in One Minute
The official ROS 2 documentation describes the ROS graph as a network of ROS 2 elements processing data together. In this project, that means:
- sensors publish measurements
- processing nodes convert raw measurements into useful state or perception outputs
- controller nodes consume those outputs
- actuator-side nodes send commands to the vehicle
In practice, understanding a ROS 2 system by following the data flow is often more effective than reading the codebase in file order.
2.2 Core ROS 2 Concepts
Before reading the project structure or running the system, it is useful to become familiar with a small set of ROS 2 concepts that appear repeatedly in the codebase, launch files, and debugging process.
The main terms are listed below:
- workspace: a collection of ROS 2 packages built together
- package: a modular unit containing source code, configuration, launch files, and related resources
- node: an executable process running in the ROS 2 system
- topic: a named communication channel used for data exchange between nodes
- message: the data structure transmitted on a topic
- parameter: a runtime configuration value associated with a node
- launch file: a script used to start and configure multiple nodes
- TF: the transform framework that represents spatial relationships between coordinate frames
The following paragraphs briefly explain the concepts that are most relevant to practical use in this project.
A node is the basic executable unit in ROS 2. In this project, different nodes usually take different roles. For example, sensor interface nodes read hardware devices, perception nodes publish lane or road information, control nodes compute vehicle commands, and utility nodes publish TF, odometry, or diagnostic information.
Useful commands:
ros2 node list
ros2 node info /<node_name>
These commands are useful for checking which nodes are running and how they interact with the rest of the system.
A topic is the main communication channel between nodes. In this project, topics are the primary way information moves between modules, such as sensors and state estimation, perception and control, teleoperation and motor control, as well as planning and logging.
Useful commands:
ros2 topic list
ros2 topic list -t
ros2 topic info /<topic_name>
ros2 topic echo /<topic_name>
When the behavior of a module is unclear, ros2 topic echo is often the fastest first check.
A parameter is a runtime configuration value associated with a node. In this project, parameters are important because camera settings may be loaded through launch files or node parameters, vehicle and sensor behavior may depend on YAML parameter files, and controller behavior may depend on runtime tuning values.
Useful commands:
ros2 param list
ros2 param get /<node_name> <parameter_name>
ros2 param dump /<node_name>
Parameter files should not be treated as secondary metadata. In robotics systems, an incorrect parameter can easily appear to be a code bug.
A launch file is used to start and configure multiple nodes as part of a complete system. This project is intended to be used through launch-based workflows rather than by manually starting every node one by one. Typical launch flows include baseline vehicle bring-up, camera and IMU launch, teleoperation launch, motor and CAN launch, and perception launch.
Useful command:
ros2 launch <package_name> <launch_file>.launch.pyThe TF framework represents spatial relationships between coordinate frames and allows data to be transformed between them over time. In this project, this is important because the camera, IMU, and vehicle body may all use different frames, while odometry and map frames may also differ. If TF is incorrect, both perception and control may fail in ways that are difficult to diagnose.
Useful command:
ros2 run tf2_tools view_framesTF tools should be checked early when data appears numerically reasonable but is displayed in the wrong position or orientation in RViz.
Commonly used commands in this project include:
pwd
ls
cd
mkdir
cp
mv
rm
cat
grep
chmod
sudo
git clone <repository_url>
Common Linux-related problems in this project include forgetting to source the environment, running commands in the wrong workspace, lacking permission to access a hardware device, and continuing work in the wrong terminal after a build.
For formal definitions and additional command-line examples, the ROS 2 official beginner documentation provides useful reference material:
Chapter 33. System ArchitectureAI Formula manual chapter 3.
This chapter gives a structured overview of the AI Formula project. The grouping below is intended as a practical reference for understanding the overall system. Some implementation details may vary slightly in specific packages or workflows.
At the highest level, the project can be divided into two parts: the hardware platform and the software platform. The hardware platform refers to the physical vehicle system. This part is not the main focus of this manual and may be read selectively. The software platform can be further divided into two parts. One is the lower-level platform, including the chassis side, motor side, and CAN bus related functions. This part is also not the main focus here and may be read selectively. The other is the ROS 2 development platform, which is the main working area for most development and experiments. This part can be further divided into the Honda side and the Sophia side.
The diagram below shows this overall structure. Items marked with * are not the main focus of this manual.
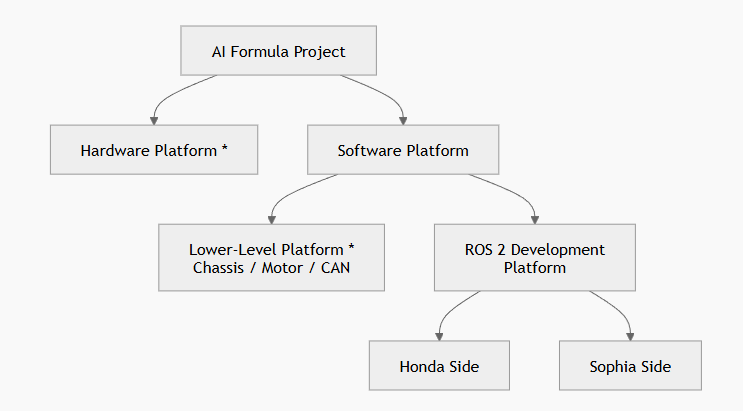
The detailed contents of each part are introduced in later chapters.
3.1 Honda Side Overview
Within the ROS 2 development platform, the Honda side mainly provides the baseline functions required to make the vehicle platform run in ROS 2. Its role can be understood from several main parts: vehicle description, sensor integration, perception, motor control, CAN communication, and baseline system bring-up.
These parts form the baseline runtime platform of AI Formula. They make the vehicle model, sensing inputs, perception outputs, and low-level communication chain available before later Sophia-side development and experiments are added.
The overall role of the Honda side is summarized in the diagram below.
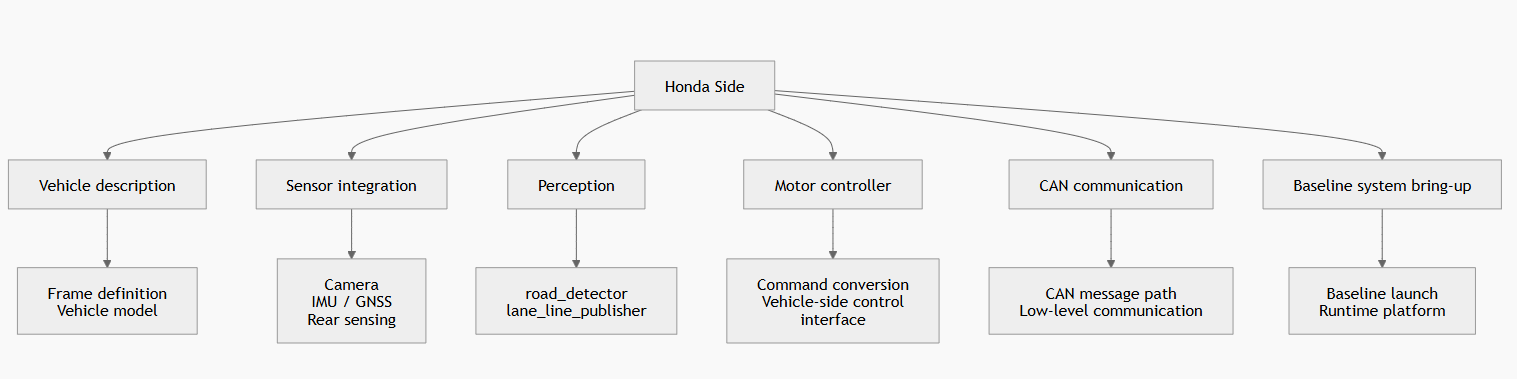
3.2 Sophia Side Overview
The Sophia side is distributed across two workspaces: aiformula (together with honda baseline) and pid_ws. In practice, this is the most useful way to understand its code organization, because Sophia-side development does not exist in only one workspace.
In the aiformula workspace, the Sophia side mainly includes packages related to perception, intermediate processing, experiment support, and launch composition. The current code includes packages such as road_detector, lane_line_publisher, lane_points, kalman_filter, obsticle_avoidence, data_record, navigation, simulator, and auto_launch.
In the pid_ws workspace, the Sophia side mainly includes path following controller related development. The main active package is trajectory_follower, which contains several controller-side executables for trajectory following, obstacle-aware control, recording, and fixed-path experiments.
Therefore, the Sophia side should be understood as a development layer distributed across both workspaces. In general, aiformula mainly provides perception-related and experiment-supporting packages, while pid_ws mainly provides controller-side logic and controller variants.
The overall structure of the Sophia side is summarized in the diagram below.
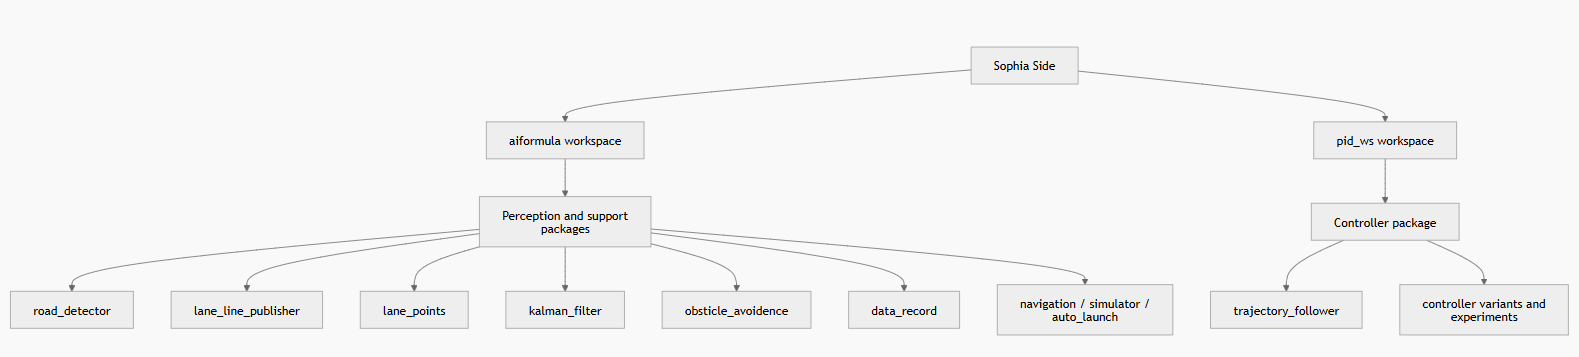
The detailed contents of these packages and workflows are introduced in the following chapters.
Chapter 44. Hardware Platform* (* means may be read selectively)AI Formula manual chapter 4.
This chapter introduces the Honda-provided hardware platform and its role in supporting the AI Formula system.
4.1 Main Components of the Hardware Platform
In this project, the hardware platform refers to the physical car and the devices directly attached to it. These mainly include the vehicle body, the wheel motors, the CAN interface, the camera, the IMU/GNSS unit, wheel speed sensors, radar (currently not used), the onboard Jetson computer, the battery, and manual joystick input. Each of these components contributes directly to the runtime system and forms part of the physical basis on which the software operates.
The vehicle body defines the mechanical structure of the platform. The vehicle adopts a three-wheel layout with two independently driven front wheels and one passive rear steering wheel. The rear steering mechanism includes spring and damping elements. This structure forms the physical basis for sensor placement, frame construction, and coordinate interpretation in the software system.
The vehicle photograph in this section shows the actual hardware layout. The coordinate-system-based load distribution figure shows the wheel arrangement together with the center-of-gravity position.
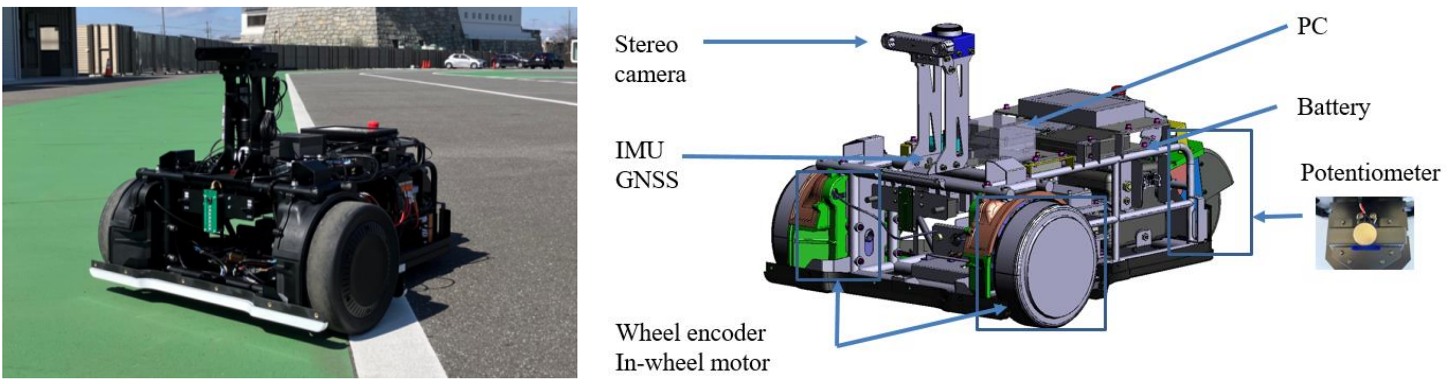
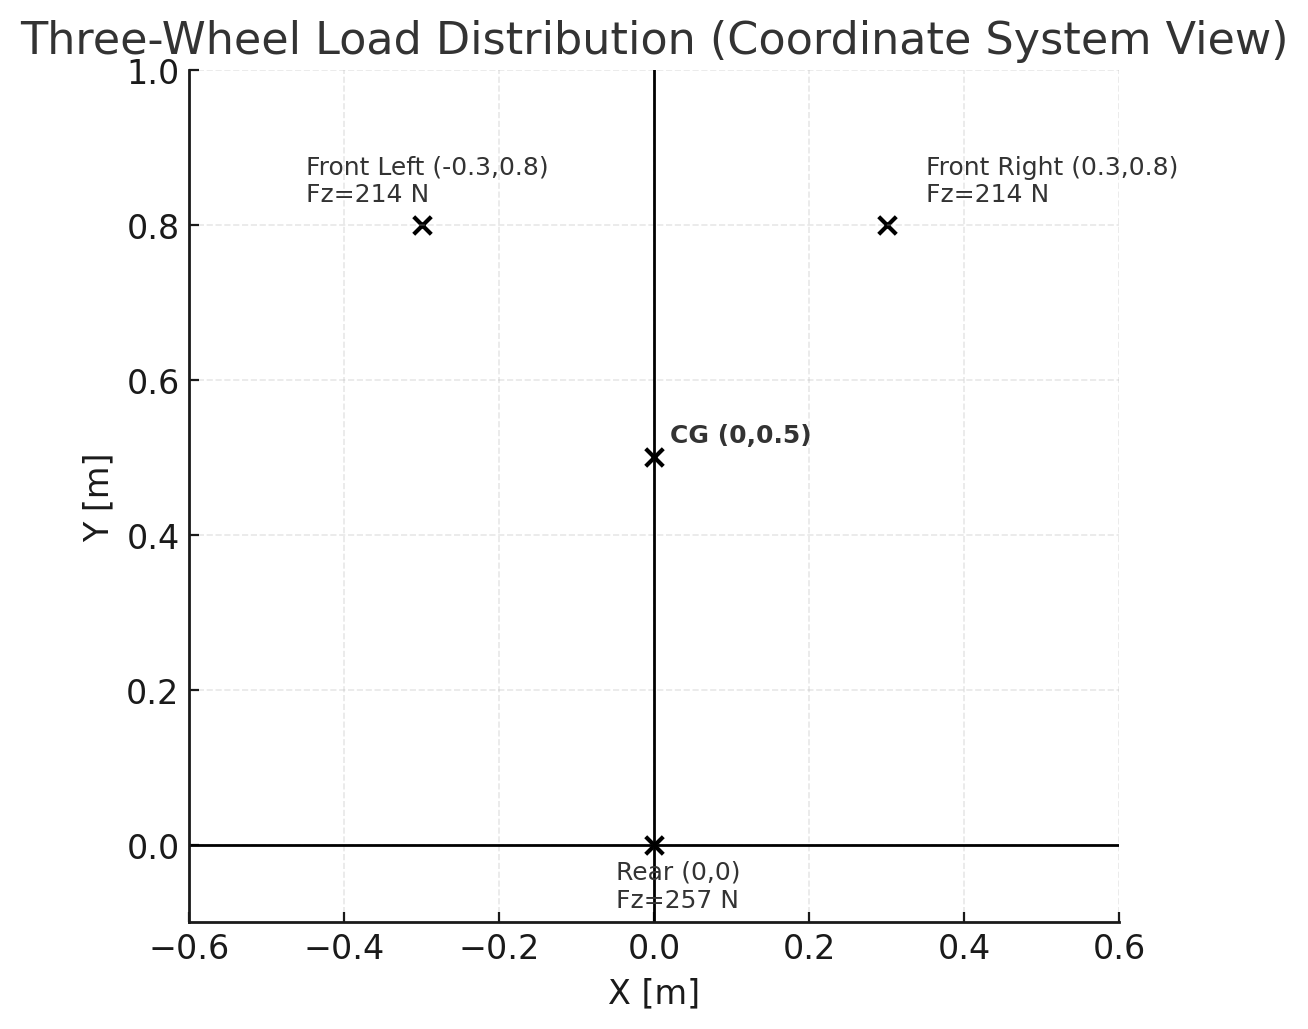
The wheel motors provide the driving force of the vehicle. The two front wheels are driven independently, which gives the platform its differential driving structure on the front axle. Their physical output is directly reflected in the actual motion behavior of the vehicle.
The CAN interface provides the communication link between the computing side and the vehicle-side electrical system. It is the physical channel through which command and feedback signals are exchanged with the car.
The camera subsystem in this project is based on a Stereolabs ZED family device, specifically a ZED X configuration in the baseline launch flow. From the system point of view, the camera provides the visual input required for lane and road related processing, together with camera calibration data and, depending on the configuration, additional sensor information from the camera stack.
Official reference:
The Stereolabs wrapper documentation states that the wrapper provides color images, depth, point clouds, position and mapping, and sensor data. For this project, the most important practical role of the camera is to provide reliable visual data in ROS 2, rather than to use every advanced feature of the ZED system.
The IMU/GNSS unit is provided by the VectorNav device. It supplies inertial measurement, orientation-related data, and GNSS-related data depending on the configuration. In this project, the important point is that vehicle state information is obtained from a dedicated external device with its own requirements for permissions, configuration, and timing.
Official reference:
The wheel speed sensors provide rotational information for the wheels and form part of the low-level sensing basis of the platform. Since wheel-related motion information is directly connected to vehicle state estimation and motion analysis, these sensors are part of the core hardware sensing chain.
The radar is mounted on the platform as part of the hardware system, although it is not currently used in the present software workflow.
The onboard Jetson computer serves as the main computing unit of the platform and provides the GPU-equipped onboard environment for system operation. It must be powered on during system use, since the software stack runs on this computing unit.
The battery supplies electrical power to the platform hardware. This includes the onboard Jetson computer as well as the other electrical components required during system operation.
The manual joystick input is part of the practical operating chain of the platform. It supports teleoperation, command-path checking, and basic vehicle operation during bring-up and testing.
Relevant hardware files for this section are provided in the following archive:
- Vehicle Document
- Board Details
- Motor Controller Guide
- CAN Commands for Ubuntu
- Parts List
- CAN ID Allocation Sheet
- RoboteQ CAN Manual
4.2 Possible Tuning Directions and Competition Constraints
In addition to understanding the existing hardware platform, it is also useful to know which parts of the vehicle may be tuned in practice and which parts are constrained by the competition rules.
According to the mobility specification, the front-wheel side is fixed in its basic architecture. The vehicle is defined as a three-wheel platform with two differential front wheels and one passive rear wheel, and the in-wheel motors on the front side must use the designated hardware without replacement. Therefore, the front-wheel drive side should be treated as fixed hardware rather than as a modification target.
By contrast, limited tuning is possible on the passive rear-wheel side. In this vehicle layout, the rear wheel has a strong influence on the traveling direction of the platform. For this reason, one practical tuning direction is to adjust the rear-wheel damping and spring stiffness within the allowed range. A representative example is the approach reported by Chiba Institute of Technology, where the damping and spring characteristics of the passive rear wheel were adjusted dynamically so that the vehicle could pass curved sections more smoothly while reducing oscillation in straight-line driving.
However, the rear-wheel mechanism is not freely modifiable. The competition rules classify passive rear-wheel mechanisms into six levels according to their functional capability. Under the current rule, Levels 1 to 4 are allowed, while Levels 5 and 6 are prohibited. The meaning of each level is summarized below together with the example cases shown in the regulation table:
- Level 1: no actuator; example cases include centering springs and dampers
- Level 2: a mechanism that changes the movable range of rear-wheel yaw through a mechanical structure; an example case is angle limitation by a plate
- Level 3: a mechanism that changes how easily the rear wheel rotates around the yaw axis; example cases include an electric suspension system and active damping
- Level 4: a mechanism that locks the rear wheel at one fixed angle only, with multiple fixed points prohibited; an example case is a mechanism that locks only at the center position where the steering angle is 0
- Level 5: a mechanism that can lock or unlock the rear wheel at arbitrary yaw angles; an example case is an electromagnetic clutch or brake; prohibited
- Level 6: a mechanism that actively steers the rear wheel around the yaw axis; an example case is power steering; prohibited
Therefore, the passive rear wheel may be tuned only within a limited passive or semi-passive range. In practical terms, adjustment of damping and spring stiffness is consistent with the allowed direction, whereas arbitrary-angle locking and active rear-wheel steering are outside the allowed range.
The hardware regulations shown in the provided figures can also be summarized as follows:
- vehicle size: 2000 mm × 800 mm × 600 mm
- vehicle mass: at least 60 kg
- drive configuration: two differential front wheels and one passive rear wheel
- tread: fixed
- wheelbase: within 2000 mm
- battery: MPP
- in-wheel motors: designated hardware, replacement prohibited
The autonomous driving rules shown in the figures further indicate that LiDAR-based methods combined with high-definition maps are prohibited, and GNSS may not be used except for safety-related functions. In addition, if autonomous driving above 15 kph is attempted, an additional safety check is required, either through an AI Formula pilot function or through an independently implemented safety function approved by the organizers.
Chapter 55. Software PlatformAI Formula manual chapter 5.
This chapter introduces the software platform used in the AI Formula system.
5.1 Software Baseline
The software baseline of this project is built on the following environment:
- Ubuntu 20.04
- ROS 2 Foxy
colconas the build tool- a mixture of
ament_cmakeandament_pythonpackages
Although ROS 2 Foxy is already end-of-life, the current project remains closely tied to this software baseline. In particular, the existing environment depends on Ubuntu 20.04, vendor-specific drivers, established ROS 2 package assumptions, and the current package APIs and launch behavior. For onboarding and daily development, the correct default is to match the existing project platform first, and to consider migration only with team agreement.
The following official references are useful for understanding the baseline development environment:
5.2 External Dependencies
In addition to the core ROS 2 environment, the project also depends on several external software components and vendor-side packages. Important dependencies shown in the project README and package structure include:
- ZED SDK and the ZED ROS 2 wrapper
- VectorNav support packages
ros2_socketcan- Nav2
These dependencies support the camera pipeline, inertial and GNSS sensing, CAN communication, and navigation-related functions of the platform.
The following references are useful when checking or maintaining these dependencies:
5.3 Package Build Systems
The codebase contains both ament_cmake packages and ament_python packages.
ament_cmakeis used mainly for C++ packagesament_pythonis used mainly for Python nodes and scripts
As a result, package entry points are not defined in a single way across the whole project. Some packages provide executables through setup.py, while others provide compiled nodes or libraries through CMake. For source reading and maintenance, it is important to first recognize which build system a package uses, because this directly affects how the package is built, installed, and executed.
5.4 Development Considerations for New Members
Several software-side risks should be kept in mind during onboarding and early development.
Workspace consistency
If the currently sourced workspace is not clear, the wrong package version may be executed. This is particularly important in a project that uses multiple workspaces.
Launch structure awareness
Launch files should not be treated as simple startup scripts. In this project, launch files define package composition, runtime structure, topic remapping, and parameter loading. In practice, the launch structure is part of the system architecture.
Caution with hardware-facing packages
Packages that directly interface with sensors, actuators, and the CAN layer should not be modified casually during early onboarding. It is safer to first understand the behavior of the baseline hardware-related stack before changing these packages.
Chapter 66. ROS 2 Practical WorkflowAI Formula manual chapter 6.
This chapter explains the practical use of ROS 2 in the AI Formula project. The focus here is not the full ROS 2 theory, but the basic usage pattern needed to build, source, launch, inspect, and operate the current system correctly.
6.1 ROS 2 Execution Methods
In this project, both ros2 launch and ros2 run are used regularly, but they serve different purposes.
ros2 launch is convenient for starting a composed runtime profile that includes multiple nodes, launch-time parameters, remappings, and shared runtime structure.
Typical examples include:
ros2 launch auto_launch auto_yolop_launch
ros2 launch launchers all_nodes
The all_nodes launcher is mainly used to start the baseline sensing and perception stack, including sensors, road_detector, and lane_line_publisher.
The auto_launch profile includes the modules above, and also adds point-cloud-related processing, obstacle avoidance, and other related modules, but it does not include the path-following controller.
ros2 run is used when a single executable should be started directly.
Typical examples include:
ros2 run motor_controller motor_controller
ros2 run lane_points lane_0529oa
ros2 run kalman_filter withoutkalman_0312
ros2 run obsticle_avoidence b_spline
ros2 run trajectory_follower lya_oa
In practice, ros2 launch is suitable for composed profiles, while ros2 run is suitable for starting one specific node or executable.
6.2 Basic Startup Flow
A basic startup flow of the current system is as follows:
source /opt/ros/foxy/setup.bash
cd <aiformula-workspace>
source install/local_setup.bash

./init_sensors.sh
ros2 launch launchers auto_launch.py
If the robot is intended to start moving, the controller-side executable can then be started from the controller workspace.
source /opt/ros/foxy/setup.bash
cd <pid-workspace>
source install/local_setup.bash

ros2 run trajectory_follower lya_follower_connected_omegat_global
This step should only be performed when the baseline system is already running correctly and the required upstream topics are available. When starting robot motion, always operate with caution and keep the emergency stop controller ready.
6.3 ROS 2 Inspection Commands
The following commands are the basic tools for checking what the current ROS 2 environment can see:
ros2 pkg list
ros2 node list
ros2 topic list
ros2 param list
These commands are useful for confirming whether the expected packages, nodes, topics, and parameters are visible in the current shell.
A more detailed inspection sequence is:
ros2 node list
ros2 topic list -t
ros2 topic info /<topic_name>
ros2 node info /<node_name>
ros2 param list
The purpose of this inspection is not only to check whether the system is running, but also to confirm whether the expected runtime graph has actually been formed.
6.4 TF and Visualization
TF and visualization tools are important for checking whether the runtime structure is consistent.
Useful tools include:
ros2 run tf2_tools view_frames
rviz2
These tools are useful for confirming whether odometry is changing, whether frame connections are consistent, and whether perception data appears in the expected coordinate frames.
6.5 Workspace Build and Source Sequence
In this project, the workspace order should follow the dependency structure. The baseline workspace aiformula should be built and sourced first, and the controller workspace pid_ws should be added afterward.
The usual sequence is:
cd <aiformula-workspace>
colcon build
source install/setup.bash
or
cd <pid-workspace>
colcon build
source install/setup.bashChapter 77. Honda Baseline ContentAI Formula manual chapter 7.
7.1 Why the Honda Material Matters
The Honda baseline material is not just background reading. It contains the assumptions that make the software meaningful.
When a newcomer asks:
- “What is this sensor physically mounted to?”
- “What does this CAN message mean?”
- “Why does this controller command have this shape?”
- “What board or device is this package talking to?”
the correct answer often begins in the Honda reference material.
7.2 How to Read the Honda Material Efficiently
Do not read every baseline document in full before doing anything else.
Use this reading order instead:
- overview or orientation material
- mechanical and board-level references
- motor controller explanation
- CAN command summary
- CAN ID allocation table
- vendor manual when you need lower-level confirmation
That order gives you fast context without drowning you in details.
7.3 Mechanical Reference
The mechanical reference helps answer:
- what the vehicle physically looks like
- what the main assemblies are
- how parts are grouped
- how the frame tree should be interpreted
Use it when:
- TF relationships seem confusing
- you want to understand where a sensor is mounted
- you need to relate a software frame to a real physical component
7.4 Board and Electrical Reference
The board-level material helps answer:
- how electronics are organized
- which boards support which devices
- where software assumptions meet hardware wiring
- which device is likely behind a missing interface
Use it when:
- a device is not appearing in Linux
- the expected connection path is unclear
- you need to distinguish a software fault from a wiring fault
7.5 Motor Controller Reference
The motor controller material is essential for understanding:
- what command values mean
- how speed-related information is encoded
- what the controller expects over CAN
- how emergency or mode-related signaling works
Use it when:
- command outputs look numerically correct but behavior is wrong
- CAN messages exist but the car response is unexpected
- you need to map ROS-side command logic to hardware-side interpretation
7.6 CAN Command Reference
The CAN command summary is the fastest place to confirm:
- how to bring the CAN interface up
- how to inspect CAN traffic
- how to send test frames
- how to think about payload formatting
For onboarding, this material is more important than the full vendor manual because it gets you to practical verification faster.
7.7 CAN ID Allocation Reference
The CAN ID allocation table answers:
- who publishes which CAN ID
- what payload belongs to which purpose
- whether a frame is command-side or feedback-side
- how message ownership is distributed
This reference becomes crucial when:
- decoding unknown traffic
- checking whether the software is writing the right frame
- diagnosing conflicting assumptions between multiple components
7.8 Parts and Assembly Reference
The parts and assembly material is useful for:
- naming physical components consistently
- understanding subsystem grouping
- avoiding vague terms like that board or that wheel sensor
Good communication depends on good naming. This reference helps the team talk about the same hardware unambiguously.
7.9 Orientation and Briefing Material
The orientation material is valuable because it often reveals:
- original project intent
- subsystem priorities
- baseline operating assumptions
- vocabulary used by Honda-side contributors
Use it to align your language with the project, especially before asking for help.
7.10 Vendor Manual
The vendor CAN or controller manual is the deep confirmation source. Do not start there unless you already know what question you are trying to answer.
Use it when you need:
- low-level command format details
- device-specific operational rules
- confirmation beyond the project summary sheets
7.11 What Counts as Stable Baseline Knowledge
For onboarding, assume the following are relatively stable unless the team says otherwise:
- physical device roles
- CAN bus fundamentals
- the meaning of major hardware subsystems
- the existence of the baseline packages for vehicle and sensor integration
What is more likely to change:
- launch composition
- Sophia controllers
- experimental perception logic
- tuning values
7.12 Practical Reading Table
| If your question is… | Start here |
|---|---|
| What physical component is this? | Mechanical and parts references |
| What board or connection is involved? | Board and electrical reference |
| What does this command mean on the vehicle side? | Motor controller reference |
| What CAN message should exist? | CAN command summary and CAN ID allocation |
| What does the vendor device officially support? | Vendor manual |
| What was the intended platform workflow? | Orientation material |
7.13 The Most Important Onboarding Rule for Baseline Material
Use the Honda baseline documents to understand constraints and assumptions, not to memorize everything.
The practical workflow is:
- identify the subsystem
- identify whether it is hardware-side or software-side
- consult the baseline material that explains that subsystem
- only then inspect the relevant package or node
This prevents a lot of wasted debugging.
Official References Used in Chapters 0-7
- ROS 2 Foxy workspace tutorial: Creating a workspace
- ROS 2 Foxy node tutorial: Understanding nodes
- ROS 2 Foxy topic tutorial: Understanding topics
- ROS 2 Foxy parameter tutorial: Understanding parameters
- ROS 2 parameter concepts: About parameters in ROS 2
- ROS 2 Foxy launch tutorial: Launching nodes
- ROS 2 TF concepts: About tf2
- Colcon official documentation: Quick start
- Nav2 official docs: Getting Started
- Stereolabs official wrapper repository: ZED ROS 2 wrapper
- VectorNav official SDK page: VectorNav SDK
Chapter 88. Sophia System OverviewAI Formula manual chapter 8.
8.1 What Sophia Owns in Practice
Sophia’s contribution is best understood as a software layer built on top of a Honda-provided vehicle and hardware baseline. In daily work, that means Sophia is mainly responsible for:
- composing higher-level runtime flows
- lane-centric perception processing
- controller development and comparison
- obstacle-aware extensions
- evaluation and data collection workflows
- keeping the two-workspace development model manageable
This chapter is intentionally practical. Instead of treating Sophia’s work as a broad “software contribution,” it separates the code into execution profiles you can recognize immediately during testing.
8.2 Main Sophia Execution Profiles
The current codebase supports several recurring usage patterns.
| Profile | Main Goal | Typical Workspace Use |
|---|---|---|
| Baseline bring-up | Verify hardware, sensing, actuation, and ROS graph health | aiformula |
| Teleoperation | Drive the platform manually and validate command flow | aiformula |
| Lane-following stack | Use perception outputs to drive the controller | aiformula + pid_ws |
| Obstacle-aware stack | Add lane point processing, filtering, and path shaping | aiformula + pid_ws |
| Navigation experiment | Use Nav2 and a prepared map | aiformula |
| Simulation run | Test launch logic and environment assumptions without hardware | aiformula |
| Metrics collection | Record planning and trajectory metrics | aiformula |
8.3 Stable Versus Experimental Code
Not every package in the Sophia layer has the same maturity.
Treat the following as relatively stable entry points:
launchersmotor_controllervectornavrear_potentiometerodometry_publisherlane_line_publishertrajectory_followerexecutables that appear in the README workflows
Treat the following as more experimental or scenario-specific:
auto_launchkalman_filtervariantslane_pointsvariantsobsticle_avoidence- some controller variants inside
trajectory_follower - alternative launch combinations such as
our_all_nodes.launch.py
That distinction matters because onboarding should start from proven flows and only then move into variants.
8.4 Sophia’s Runtime Pipelines
The quickest way to understand Sophia’s code is to look at the pipelines it creates.
Baseline platform pipeline
flowchart LR
    Vehicle["Vehicle description"] --> TF["TF and frame tree"]
    Camera["ZED X camera"] --> Topics["Sensor topics"]
    VectorNav["VectorNav"] --> Topics
    Rear["Rear potentiometer"] --> Topics
    Joy["Joystick"] --> Teleop["Teleop command"]
    Teleop --> Motor["Motor controller"]
    Motor --> CAN["CAN bus output"]
    Topics --> Odom["Odometry publisher"]
Lane-following pipeline
flowchart LR
    Image["Camera image"] --> Road["road_detector"]
    Road --> Mask["Lane mask"]
    Mask --> LLP["lane_line_publisher"]
    LLP --> Controller["trajectory_follower"]
    Odom["Odometry"] --> Controller
    Controller --> Cmd["cmd_vel"]
    Cmd --> Motor["motor_controller"]
Obstacle-aware pipeline
flowchart LR
    Image["Camera image"] --> Road["road_detector"]
    Road --> LLP["lane_line_publisher"]
    LLP --> Points["lane_points"]
    Points --> Filter["kalman_filter"]
    Filter --> Avoid["obsticle_avoidence"]
    Avoid --> Follower["trajectory_follower lya_oa"]
    Odom["Odometry"] --> Follower
    Follower --> Motor["motor_controller"]
8.5 A More Useful Way to Think About Ownership
Instead of asking “Which lab wrote this?” ask:
- Which package creates the topic?
- Which package transforms the data?
- Which package turns that data into a command?
- Which workspace must be sourced for that executable to exist?
That question sequence is better for debugging and for onboarding.
8.6 What a New Developer Should Learn First
A fast but realistic learning order is:
launchers- hardware-related packages in
aiformula road_detectorandlane_line_publishertrajectory_follower- obstacle-aware extensions
- data recording and navigation
This order mirrors how the runtime stack grows in complexity.
8.7 Current Integration Philosophy
The current codebase reflects a layered integration philosophy:
- keep hardware access close to the baseline packages
- centralize topic names and frame IDs
- build perception and controller experiments as add-on modules
- rely on launch composition to define system behavior
That means package boundaries matter. Even when a change looks small, it may affect multiple launch flows.
8.8 Where Most New Bugs Appear
In practice, new issues usually appear in four places:
- launch composition
- topic remapping
- workspace sourcing order
- assumptions about upstream topics already existing
Chapters 9-14 are written to reduce exactly those mistakes.
Chapter 99. Workspace StrategyAI Formula manual chapter 9.
9.1 Why There Are Two Workspaces
The two-workspace layout is not accidental.
aiformula exists to provide the platform itself:
- vehicle model
- hardware-facing packages
- sensing
- control interface to the vehicle
- launch orchestration
- several perception and support packages
pid_ws exists to isolate Sophia controller development:
- trajectory-following logic
- controller variants
- experiment-specific executables
- tuning and comparison workflows
Keeping these roles separate reduces risk. A controller-side change should not require reorganizing the whole platform workspace.
9.2 The Golden Rule for Daily Work
When both workspaces are needed in one shell, source them in this order:
source /opt/ros/foxy/setup.bash
source <aiformula-workspace>/install/local_setup.bash
source <pid-workspace>/install/local_setup.bash
This order matches the dependency direction:
- the base ROS 2 installation comes first
- the platform workspace comes second
- the controller workspace overlays on top
If you reverse the last two, package discovery becomes harder to reason about.
9.3 What Lives in aiformula
From a developer’s perspective, aiformula contains three layers.
Platform and hardware layer
vehiclevectornav_msgsvectornavrear_potentiometermotor_controllerodometry_publisher
Shared and orchestration layer
launcherscommon_cppcommon_python
Application and experiment layer
road_detectorlane_line_publisherlane_pointskalman_filterobsticle_avoidencedata_recordnavigationsimulatorauto_launch
9.4 What Lives in pid_ws
pid_ws is compact but important. Its main active package is:
trajectory_follower
That package bundles several executables rather than a single controller:
'lya_follower_connected_omegat_global=trajectory_follower.lya_follower_connected_omegat_global:main',
'lya_record=trajectory_follower.lya_record:main',
'lya_oa=trajectory_follower.lya_oa:main',
'lya_follower_fixedpath_record=trajectory_follower.lya_follower_fixedpath_record:main',
'lya_baseline_follower_fixedpath_record=trajectory_follower.lya_baseline_follower_fixedpath_record:main',
This is a strong hint that pid_ws is meant for controller-side experimentation and scenario selection, not for low-level hardware integration.
9.5 Build Order
Use this order when setting up or rebuilding from scratch:
- build
aiformula - source
aiformula - build
pid_ws - source
pid_ws
Typical workflow:
source /opt/ros/foxy/setup.bash

cd <aiformula-workspace>
colcon build --symlink-install
source install/local_setup.bash

cd <pid-workspace>
colcon build --symlink-install
source install/local_setup.bash
This approach matches the official ROS 2 overlay model described in the workspace tutorial.
9.6 How to Check the Active Workspace
A fast sanity check is:
ros2 pkg list | grep trajectory_follower
ros2 pkg list | grep launchers
ros2 pkg list | grep motor_controller
If trajectory_follower is missing, the pid_ws overlay is probably not active.
If launchers or motor_controller are missing, the aiformula workspace is probably not active.
9.7 Recommended Terminal Layout
For real testing, use at least three terminals:
| Terminal | Use |
|---|---|
| A | launch the baseline stack |
| B | run the controller or extra perception nodes |
| C | inspect topics, nodes, parameters, and TF |
This layout keeps build, runtime, and inspection tasks from interfering with one another.
9.8 Practical Anti-Patterns
Avoid these habits:
- building
pid_wsbefore confirming thataiformulabuilds cleanly - sourcing both workspaces in a random order
- editing hardware-facing code inside a controller debugging session
- assuming a controller node failed when the upstream topic never existed
9.9 When to Use One Workspace Only
Use only aiformula when you want:
- hardware bring-up
- teleoperation
- camera checks
- IMU or CAN verification
- Nav2 experiments
- simulation
Add pid_ws only when you need:
- trajectory follower executables
- controller comparisons
- obstacle-aware controller flows
- controller-side data recording experiments
9.10 Migration Mindset
If you later decide to merge or reorganize workspaces, do not start by moving code. First document:
- which topics cross the workspace boundary
- which launch flows rely on both workspaces
- which packages are stable
- which executables are experimental
Without that map, a cleanup refactor usually makes onboarding worse.
Chapter 1010. Environment Setup and BuildAI Formula manual chapter 10.
10.1 What You Need Before Building
At minimum, the development machine should match the project’s expected baseline:
- Ubuntu 20.04
- ROS 2 Foxy
colcon- Python build dependencies
- hardware-specific dependencies such as camera and IMU support
Useful references:
10.2 External Dependencies You Should Expect
The codebase assumes several external dependencies beyond core ROS 2:
There is also a model dependency behind road_detector that expects a YOLOP code checkout adjacent to the runtime workspace. If road_detector fails during import, check that dependency before debugging the perception logic itself.
10.3 First-Time Setup Checklist
Before your first build:
- confirm that
/opt/ros/foxyis installed - confirm that the required external repositories or SDKs are available
- confirm that Python packages used by the perception stack are installed
- confirm that the workspaces contain
src,build,install, andlogin the expected places after a build
10.4 Installing Missing ROS Dependencies
If package dependencies are missing, the usual first recovery step is:
source /opt/ros/foxy/setup.bash
cd <workspace>
rosdep install -i --from-path src --rosdistro foxy -y
The official ROS 2 docs recommend rosdep for dependency resolution. Even when the dependency graph is imperfect, rosdep remains the fastest first pass before manual fixes.
10.5 Building aiformula
For the main workspace:
source /opt/ros/foxy/setup.bash
cd <aiformula-workspace>
colcon build --symlink-install
source install/local_setup.bash
Why --symlink-install matters:
- Python edits take effect more naturally during development
- config and launch iteration is faster
- the rebuild cycle is lighter for day-to-day debugging
10.6 Building pid_ws
Once aiformula is healthy:
source /opt/ros/foxy/setup.bash
source <aiformula-workspace>/install/local_setup.bash
cd <pid-workspace>
colcon build --symlink-install
source install/local_setup.bash
This allows trajectory_follower to see the platform packages and topic conventions it depends on.
10.7 Build Verification
After building, verify package visibility immediately:
ros2 pkg list | grep launchers
ros2 pkg list | grep vehicle
ros2 pkg list | grep motor_controller
ros2 pkg list | grep trajectory_follower
If the expected package is missing, fix the environment before doing anything else.
10.8 A Better Way to Read Build Failures
Do not treat every build failure as “the package is broken.” Categorize it first:
- missing system dependency
- missing external repository
- stale build state
- wrong source order
- packaging issue
- actual compile or runtime code error
That classification saves time.
10.9 Clean Rebuild Procedure
When the workspace becomes inconsistent:
cd <workspace>
rm -rf build install log
source /opt/ros/foxy/setup.bash
colcon build --symlink-install
source install/local_setup.bash
Use this sparingly but without hesitation when the environment becomes confusing.
10.10 Build Notes by Package Style
ament_cmake
Expect these packages to behave more like compiled ROS 2 components:
common_cpplauncherslane_line_publisherodometry_publishernavigationvectornav
ament_python
Expect these packages to expose one or more Python executables through setup.py:
motor_controllerrear_potentiometerroad_detectorlane_pointskalman_filterobsticle_avoidencetrajectory_follower
This distinction matters because Python packages are often easier to patch quickly, while C++ packages often take longer to iterate and require more disciplined rebuild habits.
10.11 Packaging Caveats Worth Knowing Early
Two package patterns deserve attention:
data_record
data_record mixes generated messages with a Python package installation pattern. The design is reasonable, but you should verify after every fresh build that the runtime executable expected by the launch file is actually exposed in your environment.
auto_launch
auto_launch is useful, but it should be treated as a convenience composition layer rather than the source of truth for the whole project.
10.12 Docker as a Secondary Option
The aiformula workspace includes a Docker setup, which is useful when:
- local dependency drift becomes painful
- you need to compare behavior across machines
- you want to isolate environment setup from the host
Use Docker to stabilize the environment, not to avoid learning the project structure.
10.13 First Successful Build Goal
A successful first build is not:
- every package fully tested
- every experimental node working
- every dependency perfectly documented
It is:
aiformulabuildspid_wsbuilds- the core launch packages are discoverable
- the baseline runtime commands are available
That is enough to move into operational validation.
Chapter 1111. Package Documentation GuideAI Formula manual chapter 11.
11.1 How the Next Chapters Are Organized
The package chapters are organized by runtime role, not by alphabetical order. For each package or package family, the manual focuses on:
- why it exists
- where it sits in the pipeline
- how it is started
- what it publishes or consumes
- which package usually comes before or after it
- what breaks most often
This format is better for onboarding because the project is operated as a system, not as isolated source folders.
11.2 Read Packages From Outside In
A fast and reliable reading order for any ROS 2 package is:
- package role
- launch entry point
- remapped topics
- parameters and config
- executable entry point
- source code internals
Do not start from implementation details unless you already know the runtime role.
11.3 Recognize the Shared Naming Layer
One of the most useful design choices in this project is that topic names and frame IDs are centralized instead of being scattered everywhere.
The shared helper looks like this:
def get_frame_ids_and_topic_names():
    with open(... "topic_list.yaml") as yml:
        topic_names = yaml.safe_load(yml)
    with open(... "frame_id_list.yaml") as yml:
        frame_ids = yaml.safe_load(yml)
    return frame_ids, topic_names
This means:
- launch files are less brittle
- topic naming stays more consistent
- package interfaces are easier to audit
If a remapping bug appears, this helper layer is one of the first places to inspect.
11.4 Recognize the Shared Packaging Layer
Python packages also share a helper for install data:
def get_data_files(package_name, target_directories=()):
    data_files = [
        ('share/ament_index/resource_index/packages',
         ['resource/' + package_name]),
        (os.path.join("share", package_name), ['package.xml']),
    ]
This pattern matters because many runtime failures come from launch or config assets not being installed where the package expects them.
11.5 Topic and Frame Tables Are Architectural Assets
The central topic configuration is more than a convenience file. It is the contract between many packages.
Example excerpt:
control:
  game_pad: "/aiformula_control/joy_node/joy"
  speed_command:
    game_pad: "/aiformula_control/game_pad/cmd_vel"
  output_can_data: "/aiformula_control/motor_controller/reference_signal"
If a package seems silent, compare its expected input topic with the centralized topic map before editing code.
11.6 How to Tell Whether a Package Is Runtime-Critical
Ask four questions:
- Is it launched by
all_nodes.launch.py? - Does it publish or consume a critical topic?
- Does another package remap into it directly?
- Does it sit between software output and hardware actuation?
If the answer is yes to any of these, treat the package as runtime-critical.
11.7 How to Read Launch Files Efficiently
A launch file usually tells you four things immediately:
- which package is being started
- under which namespace it runs
- which parameters it loads
- which topics it remaps
This is often more useful than reading the executable source first.
11.8 How to Read Executable Lists
If a Python package defines several console scripts, that usually means:
- one package contains multiple scenario variants
- runtime behavior changes by executable name
- package-level understanding is not enough; variant-level understanding matters
This is especially true for trajectory_follower and kalman_filter.
11.9 Use Package Types as a Heuristic
When you see:
ament_cmake, expect compiled nodes or librariesament_python, expect faster iteration and more script-like runtime variants
This is not absolute, but it is a good operational heuristic.
11.10 A Practical Reading Order for This Project
For this specific repository, read packages in this sequence:
launchers- hardware-facing packages
road_detectorlane_line_publishertrajectory_follower- obstacle-aware extensions
- data and navigation helpers
That order mirrors how the live system is assembled.
11.11 What to Document While You Learn
As you explore a package, record:
- start command
- required upstream topics
- main output topics
- required launch arguments
- external dependencies
- one common failure mode
That running notebook becomes more valuable than a purely conceptual summary.
11.12 External References Worth Reusing
When package layout or ROS 2 conventions are unclear, prefer official documentation:
Those references are more stable than ad hoc assumptions.
Chapter 1414. Launch and OperationAI Formula manual chapter 14.
14.1 Start From a Known Good Baseline
Do not begin with the most complex experiment. Use a staged launch approach:
- source the environment correctly
- bring up hardware and baseline sensing
- verify the graph
- add perception
- add the controller
- add recording or extra features last
14.2 Pre-Run Checklist
Before any serious run, confirm:
- the correct ROS 2 installation is sourced
- the
aiformulaworkspace is sourced - the
pid_wsworkspace is sourced if controller executables are needed - CAN is up
- the IMU serial device is accessible
- the camera is available
- the expected joystick is connected if teleop is needed
14.3 Baseline Bring-Up
Use this as the default starting point:
# Terminal A
source /opt/ros/foxy/setup.bash
source <aiformula-workspace>/install/local_setup.bash
./init_sensors.sh
ros2 launch launchers all_nodes.launch.pyWhat this should give you:
- TF and robot description
- ZED camera
- VectorNav
- joystick
- teleop command path
- motor controller
- CAN bridge
- odometry publisher
- rear potentiometer publisher
14.4 Baseline Validation
In a second terminal:
source /opt/ros/foxy/setup.bash
source <aiformula-workspace>/install/local_setup.bash
ros2 node list
ros2 topic list -t
ros2 topic echo /aiformula_sensing/gyro_odometry_publisher/odomIf odometry, IMU, and command topics are all visible, the baseline is healthy enough to add higher-level software.
14.5 Teleoperation Check
Before testing autonomy, validate the manual command path:
ros2 topic echo /aiformula_control/game_pad/cmd_vel
ros2 topic echo /aiformula_control/motor_controller/reference_signalThis confirms that joystick input is being converted into motion commands and then into CAN output frames.
14.6 Perception-Only Run
If you want to validate perception without the controller:
# Terminal A
source /opt/ros/foxy/setup.bash
source <aiformula-workspace>/install/local_setup.bash
ros2 launch launchers all_nodes.launch.py
# Terminal B
source /opt/ros/foxy/setup.bash
source <aiformula-workspace>/install/local_setup.bash
ros2 launch road_detector road_detector.launch.py
# Terminal C
source /opt/ros/foxy/setup.bash
source <aiformula-workspace>/install/local_setup.bash
ros2 launch lane_line_publisher lane_line_publisher.launch.py rviz:=trueThis is a strong first software validation scenario because it exercises camera input, perception, and visualization without involving controller behavior.
14.7 Lane-Following Run
The README-supported workflow for a lane-following run is:
# Terminal A
source /opt/ros/foxy/setup.bash
source <aiformula-workspace>/install/local_setup.bash

./init_sensors.sh
ros2 launch launchers all_nodes.launch.py
# Terminal B
source /opt/ros/foxy/setup.bash
source <aiformula-workspace>/install/local_setup.bash
ros2 launch auto_launch auto_yolop_launch.py
# Terminal C
source /opt/ros/foxy/setup.bash
source <aiformula-workspace>/install/local_setup.bash
source <pid-workspace>/install/local_setup.bash
ros2 run trajectory_follower lya_follower_connected_omegat_globalWhy this sequence works:
- baseline topics exist first
- the perception stack comes online second
- the follower starts only after both sensing and lane-processing outputs are present
14.8 Obstacle-Aware Run
For the obstacle-aware profile, the repository README suggests this sequence:
# Terminal A
source /opt/ros/foxy/setup.bash
source <aiformula-workspace>/install/local_setup.bash
./init_sensors.sh
ros2 launch launchers all_nodes.launch.py
# Terminal B
source /opt/ros/foxy/setup.bash
source <aiformula-workspace>/install/local_setup.bash
ros2 launch road_detector road_detector.launch.py
# Terminal C
source /opt/ros/foxy/setup.bash
source <aiformula-workspace>/install/local_setup.bash
ros2 launch lane_line_publisher lane_line_publisher.launch.py
# Terminal D
source /opt/ros/foxy/setup.bash
source <aiformula-workspace>/install/local_setup.bash
ros2 run lane_points lane_0529oa
# Terminal E
source /opt/ros/foxy/setup.bash
source <aiformula-workspace>/install/local_setup.bash
ros2 run kalman_filter withoutkalman_0312
# Terminal F
source /opt/ros/foxy/setup.bash
source <aiformula-workspace>/install/local_setup.bash
ros2 run obsticle_avoidence b_spline
# Terminal G
source /opt/ros/foxy/setup.bash
source <aiformula-workspace>/install/local_setup.bash
source <pid-workspace>/install/local_setup.bash
ros2 run trajectory_follower lya_oaThis is the most complex standard profile in the current codebase. Use it only after the simpler lane-following run is stable.
14.9 Data Recording Run
To capture metrics and a bag:
source /opt/ros/foxy/setup.bash
source <aiformula-workspace>/install/local_setup.bash
ros2 launch data_record data_record.launch.pyThis is best started after the main planning or controller stack is already producing:
- planned path
- odometry
- controller trajectory
- planner metrics
14.10 Navigation Run
When you want to experiment with Nav2:
source /opt/ros/foxy/setup.bash
source <aiformula-workspace>/install/local_setup.bash
ros2 launch navigation aiformula_navigation_launch.pyUse this profile for map-based navigation experiments, not as your first onboarding test.
14.11 Simulation Run
To test launch logic without hardware:
source /opt/ros/foxy/setup.bash
source <aiformula-workspace>/install/local_setup.bash
ros2 launch simulator gazebo_simulator.launch.pySimulation is especially useful when:
- a hardware device is unavailable
- you want to inspect launch composition safely
- you need a testbed for visualization or TF
14.12 Quick Diagnostic Commands During Operation
Keep these ready in an inspection terminal:
ros2 node list
ros2 topic list -t
ros2 topic echo /aiformula_control/motor_controller/reference_signal
ros2 topic echo /aiformula_sensing/gyro_odometry_publisher/odom
ros2 param list
ros2 run tf2_tools view_framesThese commands answer most first-order debugging questions faster than reading source code mid-run.
14.13 Safe Shutdown
When stopping a multi-terminal session:
- stop controller-side nodes first
- stop perception-side add-on nodes next
- stop the baseline launch last
- bring CAN down only after the ROS session is closed if required by your workflow
This avoids leaving the system in an unclear command state.
14.14 Which Launch to Prefer
Prefer these entry points first:
launchers all_nodes.launch.pyroad_detector road_detector.launch.pylane_line_publisher lane_line_publisher.launch.pyauto_launch auto_yolop_launch.pynavigation aiformula_navigation_launch.pysimulator gazebo_simulator.launch.py
Treat these as secondary or variant flows until validated:
launchers our_all_nodes.launch.py- any experimental executable you have not personally confirmed in the current environment
14.15 A Good Operational Habit
At the start of every run, ask:
- which workspace am I using?
- which package creates my upstream input?
- which launch owns this topic mapping?
- which node should I inspect first if this stage fails?
That habit is what turns a new team member into a productive one quickly.
Chapter 1515. Commands and Daily WorkflowAI Formula manual chapter 15.
15.1 A Good Daily Rhythm
The fastest way to stay productive in this project is to keep a repeatable command routine. Do not improvise shell state if you can avoid it. Most confusing failures in ROS 2 projects come from one of four causes:
- the wrong workspace is active
- an overlay was sourced in the wrong order
- a node is running but publishing to a different topic than expected
- the hardware baseline was not brought up before the software layer
Treat the workday as a sequence:
- prepare the shell
- build only what changed
- source in the correct order
- launch the smallest useful runtime
- inspect topics and nodes before adding more layers
- record data if the run matters
- shut down cleanly
15.2 Recommended Terminal Layout
For most sessions, three terminals are enough.
- Terminal A: baseline build and source
- Terminal B: runtime launch and node execution
- Terminal C: inspection, diagnostics, bag commands, and quick checks
If you are using both workspaces, keep the controller workspace in a separate shell from the baseline workspace until you are sure the overlay order is correct.
flowchart LR
A["Terminal A<br/>build + source"] --> B["Terminal B<br/>launch baseline"]
B --> C["Add perception nodes"]
C --> D["Add controller node"]
D --> E["Terminal C<br/>inspect topics, TF, params"]
E --> F["Record bag if needed"]
F --> G["Stop add-on nodes first"]15.3 Build the Baseline Workspace
Use the baseline workspace for shared packages, sensing, perception, launchers, navigation, and simulation.
cd <aiformula-workspace>
source /opt/ros/foxy/setup.bash
colcon build --symlink-install
source install/setup.bashWhy this matters:
--symlink-installmakes Python-side iteration faster- sourcing after the build ensures the shell sees the newest package metadata
- keeping the baseline workspace active first reduces overlay confusion later
The official ROS 2 workspace tutorial and colcon quick start are still the right mental model here, even though this project targets ROS 2 Foxy.
15.4 Build the Controller Workspace
Use the controller workspace when you need the Sophia controller executables.
cd <pid_ws-workspace>
source /opt/ros/foxy/setup.bash
source <aiformula-workspace>/install/setup.bash
colcon build --symlink-install
source install/setup.bashThe key rule is simple: source the baseline before the controller overlay. If you reverse that order, the controller nodes may start with incomplete package visibility.
15.5 Quick Environment Check
Before launching anything expensive, spend ten seconds on a sanity check.
ros2 pkg list | grep launchers
ros2 pkg list | grep trajectory_follower
ros2 pkg list | grep motor_controllerIf trajectory_follower is missing, the controller workspace is probably not sourced. If launchers or motor_controller is missing, the baseline workspace is probably not sourced.
15.6 Baseline Bring-Up
Use the baseline bring-up first when working with real hardware.
./init_sensors.sh
ros2 launch launchers all_nodes.launch.pyThis is the minimum flow for:
- CAN bridge setup
- camera launch
- IMU and GNSS launch
- manual input setup
- motor-controller connectivity
- baseline odometry
If this step is unhealthy, do not jump ahead to lane following or obstacle avoidance.
15.7 Perception Stack
When you need the road and lane pipeline without obstacle-aware planning:
ros2 launch auto_launch auto_yolop_launch.pyThat launch composes the road detector, lane extraction stages, and the current filtering stage into a single flow that is easier to start and inspect.
If you want to expose each stage separately, use:
ros2 launch road_detector road_detector.launch.py
ros2 launch lane_line_publisher lane_line_publisher.launch.py
ros2 run lane_points lane_0215
ros2 run kalman_filter withoutkalman_0312This form is slower to start, but much better for debugging.
15.8 Lane-Following Controller Run
For the common lane-following controller profile:
ros2 run trajectory_follower lya_follower_connected_omegat_globalRun this only after:
- the baseline launch is healthy
- perception topics are being published
- odometry is available
15.9 Obstacle-Aware Controller Run
For the obstacle-aware runtime:
ros2 launch road_detector road_detector.launch.py
ros2 launch lane_line_publisher lane_line_publisher.launch.py
ros2 run lane_points lane_0529oa
ros2 run kalman_filter withoutkalman_0312
ros2 run obsticle_avoidence b_spline
ros2 run trajectory_follower lya_oaThis chain is intentionally modular. It is easier to diagnose because every stage can be inspected independently.
15.10 Navigation Run
Navigation is an experimental path that uses the prepared Nav2 integration.
ros2 launch navigation aiformula_navigation_launch.pyUse this when you specifically want a map-based navigation test, not as the default first-day workflow. The official Nav2 getting started guide is useful for background, but your first success criterion in this project should still be baseline launch health and controller visibility.
15.11 Simulation Run
Simulation is the safest place to verify launch composition and TF assumptions.
ros2 launch simulator gazebo_simulator.launch.pyUse simulation when:
- a hardware device is unavailable
- you need to validate a launch change
- you want to inspect the TF tree without involving real sensors
15.12 Data Recording Run
When a run should be comparable later, record metrics and bag data together.
ros2 launch data_record data_record.launch.pyFor ad hoc bagging:
ros2 bag record /planned_path /odom /controller/trajectory /planner/metricsFor replay:
ros2 bag info <bag-directory>
ros2 bag play <bag-directory>The official rosbag tutorial is a good reference when you want a reminder of playback options.
15.13 Daily Inspection Commands
Keep these commands ready in your inspection terminal.
ros2 node list
ros2 topic list -t
ros2 topic info /aiformula_sensing/gyro_odometry_publisher/odom
ros2 topic echo /aiformula_control/motor_controller/reference_signal
ros2 topic hz /aiformula_sensing/vectornav/imu
ros2 param list
ros2 param get /motor_controller use_handle_controller
ros2 interface show data_record/msg/PlannerMetrics
ros2 run tf2_tools view_framesThese commands are more useful than opening source code too early. The official nodes tutorial, topics tutorial, and parameters tutorial explain the same workflow at a smaller scale.
15.14 Fast Recovery Commands
When a shell gets messy, reset it instead of stacking new source commands forever.
exec bash
source /opt/ros/foxy/setup.bash
source <aiformula-workspace>/install/setup.bash
source <pid_ws-workspace>/install/setup.bashIf you are not sure which overlay is active, a fresh shell is usually faster than forensic debugging.
15.15 Daily Workflow Summary
If you only remember one habit, remember this:
- baseline first
- perception second
- controller third
- recording fourth
- shutdown in reverse order
Chapter 1616. Source Code Reading GuideAI Formula manual chapter 16.
16.1 Read the Runtime, Not the Alphabet
Do not start by opening files in alphabetical order. Start from the command you intend to run, then trace outward.
Good reading order:
- identify the launch or executable command
- identify the package that owns it
- inspect the package build file
- inspect launch composition and parameters
- inspect the node entry point
- inspect the core processing logic
- inspect helper libraries only after the data path is clear
That order helps you understand what matters at runtime first.
16.2 Recognize Package Type First
In this project, packages fall into two main build styles.
ament_python: usually has asetup.pywithconsole_scriptsament_cmake: usually has aCMakeLists.txtwithadd_executable
For Python packages, the quickest orientation step is to find the exported executable name.
entry_points={
'console_scripts': [
'lya_oa=trajectory_follower.lya_oa:main',
],
}This tells you:
- the command is
ros2 run trajectory_follower lya_oa - the runtime entry point is the
main()function inside thelya_oamodule
For C++ packages, the equivalent clue is the executable target.
add_executable(gyro_odometry_publisher
src/odometry_publisher.cpp
src/gyro_odometry_publisher/gyro_odometry_publisher.cpp
src/gyro_odometry_publisher/gyro_odometry_publisher_node.cpp
)This tells you where the node implementation begins and which helper files shape the behavior.
16.3 Read Launch Files as Wiring Diagrams
In this project, launch files are not decoration. They are the system wiring layer.
When reading a launch file, look for:
- included launches
- node names
- remappings
- parameters
- namespace assignments
- conditional branches
If you understand those six things, you understand most of the runtime graph.
The official ROS 2 launch tutorial is a good refresher for launch behavior, but in this project you should read launches as operational profiles rather than abstract examples.
16.4 Read Configuration Before Algorithms
Many “algorithm” questions in practice are actually configuration questions.
Before you study math-heavy code, confirm:
- which topic names are expected
- which frame names are expected
- whether the node expects real hardware or replay data
- whether the node assumes a specific camera resolution
- whether launch-time remapping changes the default behavior
This is especially important for:
- lane-related perception nodes
- odometry publishers
- controller nodes that subscribe to filtered or transformed outputs
16.5 Follow the Data Path
When you are reading unfamiliar code, ask one simple question:
What comes in, what is transformed, and what goes out?
A useful shell workflow is:
ros2 topic info /aiformula_perception/lane_line_publisher/lane_lines/center
ros2 node info /lane_line_publisher
ros2 interface show sensor_msgs/msg/PointCloud2That sequence often answers:
- who publishes the data
- who consumes it
- what the message shape looks like
16.6 Follow the Control Path
The control side can be read with the same discipline:
- controller node publishes
Twist - motor-controller node subscribes to that command
- motor-controller node converts the command into CAN payloads
- CAN sender pushes the frame to the vehicle interface
When that path fails, debug it one edge at a time. Do not jump straight to the vehicle.
16.7 Understand the Two-Workspace Split
Read the code with the workspace model in mind.
- the baseline workspace owns the platform, launchers, sensing, perception, and simulation
- the controller workspace owns the Sophia-side trajectory follower logic
If you forget that split, you will search the wrong workspace and assume code is missing when it is only in the other overlay.
16.8 How to Read the Controller Package
The controller package is easiest to understand if you divide it into variants instead of files.
- lane-following variants
- obstacle-aware variants
- fixed-path recording variants
- baseline comparison variants
The question to ask is not “which script is newest?” but “which runtime profile is this variant meant to serve?”
16.9 How to Spot Stable Code Versus Experimental Code
Stable code usually has most of these signs:
- exported as a package executable
- reachable by a launch or README command
- topic names aligned with the shared naming layer
- parameters externalized
- linter tests present
Experimental code usually has most of these signs:
- direct script-style logic with narrow assumptions
- little or no launch integration
- hardcoded topic names or constants
- variant naming without documentation
This does not mean experimental code is unimportant. It means you should treat it as a reference, not a default entry point.
16.10 How to Read a New Package Efficiently
Use this checklist:
1. What command starts it?
2. Which workspace contains it?
3. What does it subscribe to?
4. What does it publish?
5. Which launch includes it?
6. Which parameters change its behavior?
7. Is it part of a standard run profile?If you answer those seven questions, you usually understand enough to use the package productively on day one.
16.11 Code Reading References
Useful official references:
Chapter 1717. Interfaces and Runtime ContractsAI Formula manual chapter 17.
17.1 Why Runtime Contracts Matter
A runtime contract is the agreement between nodes about:
- message type
- topic name
- frame name
- timing expectation
- semantic meaning
Most integration failures are contract failures, not syntax failures.
17.2 Main Message Families
This project mostly builds on standard ROS 2 message types plus a small number of project-specific interfaces.
Common standard message families:
sensor_msgs/Imagesensor_msgs/Imusensor_msgs/NavSatFixnav_msgs/Odometrygeometry_msgs/Twistsensor_msgs/Joycan_msgs/Framenav_msgs/Path
Project-specific message families:
data_record/msg/PlannerMetricsvectornav_msgs/*
17.3 Planner Metrics Interface
The custom planning metrics message is intentionally compact.
builtin_interfaces/Time stamp
float32 path_length
float32 curvature_avg
float32 curvature_max
float32 v_max
float32 a_max
float32 plan_time_ms
float32 exec_latency_msThis message is useful because it turns a run into something you can compare numerically instead of only visually.
Inspect it with:
ros2 interface show data_record/msg/PlannerMetrics17.4 Key Topic Catalog
The table below lists the topics a newcomer should recognize immediately.
| Topic | Typical Type | Main Meaning |
|---|---|---|
/aiformula_sensing/zed_node/left_image/undistorted | sensor_msgs/Image | Left camera image used by the perception stack |
/aiformula_sensing/zed_node/right_image/undistorted | sensor_msgs/Image | Right camera image from the ZED pipeline |
/aiformula_sensing/zed_node/imu | sensor_msgs/Imu | Camera IMU stream |
/aiformula_sensing/vectornav/imu | sensor_msgs/Imu | VectorNav IMU stream |
/aiformula_sensing/vectornav/gnss | sensor_msgs/NavSatFix | GNSS output from the VectorNav driver |
/aiformula_sensing/vehicle_info | can_msgs/Frame or bridge equivalent | Incoming vehicle-side CAN data |
/aiformula_sensing/gyro_odometry_publisher/odom | nav_msgs/Odometry | Baseline odometry used heavily by controllers |
/aiformula_sensing/wheel_odometry_publisher/odom | nav_msgs/Odometry | Wheel-based odometry estimate |
/aiformula_sensing/rear_potentiometer/yaw | project-specific numeric stream | Rear steering or rear-angle sensing output |
/aiformula_perception/road_detector/mask_image | sensor_msgs/Image | Segmented road mask |
/aiformula_perception/lane_line_publisher/lane_lines/left | lane representation | Left lane output |
/aiformula_perception/lane_line_publisher/lane_lines/right | lane representation | Right lane output |
/aiformula_perception/lane_line_publisher/lane_lines/center | lane representation | Centerline output consumed by downstream nodes |
/aiformula_control/joy_node/joy | sensor_msgs/Joy | Manual gamepad input |
/aiformula_control/game_pad/cmd_vel | geometry_msgs/Twist | High-level velocity command path |
/aiformula_control/motor_controller/reference_signal | can_msgs/Frame | Outgoing actuation signal toward the CAN layer |
17.5 Main Frame Catalog
The shared frame naming layer is small enough to memorize.
| Frame | Meaning |
|---|---|
map | Global frame for navigation-style reasoning |
odom | Continuous local odometry frame |
base_footprint | Ground-projected vehicle base frame |
base_link | Main vehicle body frame |
caster_back_link | Rear caster reference |
wheel_left_link | Left wheel frame |
wheel_right_link | Right wheel frame |
zed_camera_center | ZED camera center frame |
zed_left_camera_optical_frame | Left camera optical frame |
zed_right_camera_optical_frame | Right camera optical frame |
If these names drift across packages, TF debugging becomes much harder than it needs to be.
17.6 Topic Naming Contract
The naming pattern is consistent on purpose.
- sensing topics begin with
/aiformula_sensing - perception topics begin with
/aiformula_perception - control topics begin with
/aiformula_control - visualization topics begin with
/aiformula_visualization
Respect that structure when adding new topics. It makes runtime inspection dramatically easier.
17.7 Launch-to-Node Contract
In this project, launch files often do more than start nodes. They also define:
- remappings
- parameter files
- namespaces
- assumptions about hardware availability
That means a node is not fully understood until you understand how it is launched.
17.8 Odometry Contract
The controller side assumes odometry is present, stable, and frame-consistent. In practice, that means:
- the odometry topic is alive
- the timestamps are recent
- the frame IDs are coherent with the TF tree
- the values are not obviously frozen or exploding
You can confirm the first three quickly with:
ros2 topic echo /aiformula_sensing/gyro_odometry_publisher/odom
ros2 topic hz /aiformula_sensing/gyro_odometry_publisher/odom
ros2 run tf2_tools view_frames17.9 Control Contract
The control contract is:
- upstream nodes publish a valid
Twist - the motor-controller node converts that command to a vehicle-side representation
- the CAN bridge is up before actuation is attempted
If the vehicle does not move, inspect the command edge first, not the controller math.
17.10 Perception Contract
The perception contract is:
- undistorted image input is available
- the road detector publishes a usable mask
- lane extraction receives the expected mask topic
- lane points or filtered outputs exist before the controller starts depending on them
If lane following fails, inspect those stages in order.
17.11 Timing Contract
This project does not need perfect formal real-time guarantees for basic onboarding, but it does need sane timing behavior.
At minimum:
- sensor streams should update at a steady rate
- odometry should not stall
- controller commands should reflect current state, not stale state
- bag replay should be clearly distinguished from live hardware use
ros2 topic hz is often the quickest way to validate timing health.
17.12 Interface Inspection Commands
These commands help you read contracts without opening source code.
ros2 interface show data_record/msg/PlannerMetrics
ros2 interface show nav_msgs/msg/Odometry
ros2 interface show geometry_msgs/msg/Twist
ros2 topic info /aiformula_control/game_pad/cmd_vel
ros2 node info /motor_controller17.13 Contract Rule for New Development
When adding a new node or package:
- do not invent a naming scheme that ignores the existing namespaces
- do not hardcode alternate topic names unless there is a documented reason
- do not silently change frame IDs
- do not bypass launch-layer parameterization if the value should be configurable
These rules save future teammates from tracing invisible integration changes.
Chapter 1818. Testing and ValidationAI Formula manual chapter 18.
18.1 What “Tested” Means in This Project
In this project, “tested” should mean more than “the node starts.”
Good validation covers three levels:
- build and lint checks
- package-level startup checks
- runtime behavior checks on the real or simulated stack
Many local packages already include standard ROS 2 linter tests through ament_flake8, ament_pep257, ament_copyright, or ament_lint_auto. That is useful, but it is not enough to prove that perception and control behave correctly at runtime.
18.2 Testing Pyramid for This Project
flowchart TD
A["Runtime validation<br/>full launch, sensor health, control behavior"] --> B["Package execution<br/>node starts, topics appear, parameters load"]
B --> C["Build and lint<br/>colcon build, pytest, ament linters"]The top layer matters most for actual vehicle work, but the lower layers are the cheapest place to catch mistakes early.
18.3 Build and Lint Checks
The first gate is simple:
colcon build --symlink-install
colcon test
colcon test-result --verboseFor a narrower check:
colcon test --packages-select motor_controller lane_points trajectory_follower
colcon test-result --verboseThe official ROS 2 Python testing tutorial and pytest getting started guide are useful if you want to understand the standard test scaffolding already present in many packages.
18.4 What Existing Local Tests Actually Cover
In the current codebase, many tests are quality scaffolding rather than behavior tests. That usually means:
- style conformance
- docstring formatting
- basic package test integration
What they usually do not prove:
- the camera is publishing valid images
- the CAN bridge is healthy
- the lane extractor finds lanes correctly on current data
- the controller tracks well on the actual platform
That is why runtime validation remains essential.
18.5 Baseline Validation Sequence
Use this order for a real system health check.
- verify the workspace and package visibility
- verify sensor bring-up
- verify CAN bridge health
- verify odometry
- verify teleoperation command flow
- verify perception outputs
- verify controller outputs
If one step fails, stop there and fix it before moving on.
18.6 Sensor Sanity Checks
Useful checks:
ros2 topic hz /aiformula_sensing/vectornav/imu
ros2 topic hz /aiformula_sensing/zed_node/left_image/undistorted
ros2 topic echo /aiformula_sensing/vectornav/gnssLook for:
- regular message flow
- fresh timestamps
- values that look plausible rather than frozen or wildly noisy
18.7 Odometry Validation
Odometry is central enough that it deserves its own explicit check.
ros2 topic echo /aiformula_sensing/gyro_odometry_publisher/odom
ros2 topic hz /aiformula_sensing/gyro_odometry_publisher/odom
ros2 run tf2_tools view_framesPass conditions for onboarding:
- topic exists
- message rate is nonzero and stable
- pose and twist values evolve plausibly
- TF contains the expected base and odom frames
18.8 Perception Validation
The minimal perception check is:
ros2 topic echo /aiformula_perception/road_detector/mask_image
ros2 topic echo /aiformula_perception/lane_line_publisher/lane_lines/centerFor practical debugging, visual tools are often better than raw text. Use RViz when the launch supports it, and use the annotated perception image when available.
18.9 Controller Validation
A controller run is only meaningful if upstream inputs already exist.
Before you trust a controller result, confirm:
- odometry exists
- upstream lane or trajectory inputs exist
- the controller output topic changes over time
- the motor-controller reference signal reflects those changes
Useful commands:
ros2 topic echo /aiformula_control/game_pad/cmd_vel
ros2 topic echo /aiformula_control/motor_controller/reference_signal18.10 End-to-End Validation
For end-to-end validation, the goal is not perfect driving on day one. The goal is a coherent closed chain:
- sensor input is alive
- processing nodes receive data
- perception outputs are published
- controller outputs are published
- actuation reference messages appear
That is the correct first milestone.
18.11 Simulation Validation
Use simulation to validate:
- launch composition
- TF publication
- package discovery
- parameter loading
Do not use simulation alone to claim hardware readiness.
18.12 Recording for Comparison
A run becomes more useful when you can compare it later.
Recommended approach:
- record the run
- save brief notes on what changed
- compare metrics and playback behavior later
Even a short bag plus a short run log can save hours of memory-based guessing.
18.13 Suggested Acceptance Criteria
For a new team member’s first successful session, the bar should be realistic.
Good first acceptance criteria:
- both workspaces build successfully
- baseline launch starts
- sensor topics appear
- odometry appears
- a perception topic appears
- a controller executable starts
- a control command or CAN reference signal appears
- the session can be shut down cleanly
18.14 Testing References
Helpful official references:
Chapter 1919. TroubleshootingAI Formula manual chapter 19.
19.1 Troubleshoot by Stage, Not by Panic
The fastest way to debug this project is to ask where the failure first becomes visible.
flowchart TD
A["System not working"] --> B["Build or source issue?"]
B -->|Yes| C["Check workspace, source order, package visibility"]
B -->|No| D["Launch issue?"]
D -->|Yes| E["Check missing dependencies, parameter files, device access"]
D -->|No| F["Runtime data issue?"]
F -->|Yes| G["Check topics, rates, frames, remappings"]
F -->|No| H["Behavior issue?"]
H --> I["Check upstream inputs before tuning algorithms"]This avoids the common mistake of debugging the controller when the actual failure is an absent sensor topic.
19.2 Package Not Found
Symptom:
ros2 launchorros2 runsays the package cannot be found
Check:
ros2 pkg list | grep <package-name>Likely causes:
- workspace not sourced
- wrong shell
- build failed earlier
- overlay sourced in the wrong order
Fix:
- open a fresh shell
- source
/opt/ros/foxy/setup.bash - source the baseline workspace
- source the controller workspace if needed
19.3 Launch Fails Immediately
Symptom:
- the launch exits before the runtime graph forms
Check:
- missing dependency packages
- missing external SDK
- bad launch argument
- unavailable device
Helpful commands:
ros2 launch <package> <launch-file> --show-args
ros2 pkg list19.4 Sensor Topic Missing
Symptom:
- no camera, IMU, GNSS, or CAN-driven data shows up
Check in order:
- did the hardware bring-up run
- is the device physically connected
- is the driver node present in
ros2 node list - does the topic exist in
ros2 topic list -t
If the driver node is not present, solve the launch or device problem first.
19.5 CAN Path Missing
Symptom:
- no outgoing reference signal or no incoming vehicle-side feedback
Check:
ros2 topic echo /aiformula_control/motor_controller/reference_signal
ros2 topic echo /aiformula_sensing/vehicle_infoIf the control signal exists but the vehicle-side topic does not, the bridge or hardware interface is the likely problem.
The CAN layer depends on ros2_socketcan, so missing bridge behavior may also reflect an external dependency or kernel-side issue rather than a project-local Python bug.
19.6 No Odometry
Symptom:
- controller nodes start but do nothing useful
Check:
ros2 topic echo /aiformula_sensing/gyro_odometry_publisher/odom
ros2 node listIf the odometry publisher is absent, inspect the baseline launch. If it is present but silent, inspect its sensor inputs next.
19.7 Perception Stack Is Silent
Symptom:
- the road detector or lane extractor starts, but no usable output appears
Debug in this order:
- confirm image input exists
- confirm the road mask topic exists
- confirm lane extraction subscribes to the correct mask topic
- confirm downstream processing nodes subscribe to the expected lane topic
Do not start tuning filters before confirming the mask exists.
19.8 Controller Runs but Vehicle Does Not Respond
Symptom:
- controller node publishes commands, but the platform does not move
Check:
- the controller output topic
- the motor-controller input remapping
- the motor-controller output reference signal
- the CAN bridge health
If the controller output never changes, the issue is upstream. If the motor-controller reference signal exists, the issue is further downstream.
19.9 TF Looks Wrong
Symptom:
- RViz view is inconsistent
- odometry behaves strangely
- transforms appear disconnected
Check:
ros2 run tf2_tools view_framesReview whether:
base_linkexistsodomexists- camera frames exist
- the graph is connected the way the runtime expects
The official tf2 overview is still a good conceptual reference.
19.10 Behavior Is Wrong but Topics Exist
This is the important diagnostic split:
- if topics do not exist, you have an integration problem
- if topics exist but values are poor, you may have a tuning or algorithm problem
Only move into tuning once the integration layer is clearly healthy.
19.11 Replay and Live Data Got Mixed
Symptom:
- values look reasonable, but behavior is confusing or delayed
Possible cause:
- bag replay and live hardware are active in the same session
Fix:
- stop one data source
- reopen the shell if needed
- restart with a single clear runtime mode
19.12 A Good Troubleshooting Habit
When something breaks, write down:
- what command you ran
- what you expected
- the first thing that was missing
- the first thing that was clearly wrong
That short note is often enough to make the second debugging pass much faster.
Chapter 2020. Engineering StandardsAI Formula manual chapter 20.
20.1 Why Standards Matter Here
This project already combines:
- hardware integration
- ROS 2 launch composition
- C++ sensing and geometry code
- Python perception and controller code
- two workspaces with overlays
Without standards, the project becomes hard to maintain very quickly.
20.2 General Development Rules
Use these as default rules:
- make the smallest change that solves the current problem
- preserve topic and frame naming consistency
- prefer parameters over hardcoded constants
- keep runtime commands stable across teammates
- update documentation when behavior changes
20.3 Package Structure Rules
A healthy package should make its purpose obvious.
Good package structure usually means:
- one clear package responsibility
- one understandable runtime entry point per behavior
- launch files for operational profiles
- configuration separated from algorithm code
- tests present even if they are initially lint-focused
20.4 Python Coding Conventions
Use PEP 8 as the baseline style reference.
Project-specific guidance:
- keep
main()small and focused on ROS node lifecycle - move heavy processing into helper functions or classes
- avoid giant scripts that mix I/O, math, logging, and visualization together
- use descriptive variable names for topics, frames, and parameters
- log important state changes with the ROS logger rather than
print - do not hide magic constants deep inside callbacks if they should be tuned
Good Python ROS node shape:
def main(args=None):
rclpy.init(args=args)
node = MyNode()
rclpy.spin(node)
node.destroy_node()
rclpy.shutdown()That shape keeps node lifecycle behavior recognizable to everyone.
20.5 C++ Coding Conventions
Use a consistent modern C++ style and keep code warning-clean. The local C++ packages already compile with warning-focused settings, and several packages use C++17.
Use the Google C++ Style Guide as a general reference, adapted to the conventions already present in the repository.
Project-specific guidance:
- separate node wrapper logic from processing logic
- keep headers focused on interfaces
- keep implementation details in source files
- avoid unnecessary global state
- prefer explicit dependencies and includes
- make TF, geometry, and unit assumptions visible
20.6 ROS 2 Naming Conventions
Naming rules should stay boring and predictable.
- package names: lowercase with underscores
- node names: clear, descriptive, aligned with runtime role
- topics: keep the existing sensing, perception, control, visualization prefixes
- parameters: use clear nouns and units where possible
- frame IDs: reuse the shared frame names instead of inventing variants
20.7 Launch Design Conventions
Launch files should answer an operational question.
Good examples:
- launch the baseline stack
- launch manual input
- launch one sensing subsystem
- launch one perception stage
- launch a composed end-to-end profile
Avoid launch files that only make sense to their original author.
20.8 Configuration Conventions
A value should live in configuration if:
- it changes between machines
- it changes between runtime profiles
- it is likely to be tuned
- it expresses naming, topic, or frame policy
Do not hardcode those values in callbacks unless there is a strong reason.
20.9 Logging Conventions
Logs should help a teammate answer:
- did the node start
- what inputs is it using
- what output is it publishing
- what mode is it in
- why did it reject or skip work
Bad logs are either silent or noisy. Aim for informative and sparse.
20.10 Error-Handling Conventions
Use explicit checks for:
- missing parameters
- missing inputs
- invalid message content
- unavailable devices
- impossible state transitions
Fail early when the node cannot do useful work. Silent partial failure is harder to debug than a clear startup error.
20.11 Comment and Docstring Standards
Comments should explain why something exists, not restate obvious syntax.
Good use cases for comments:
- unusual control logic
- frame assumptions
- unit conversions
- safety-sensitive behavior
- historical workaround that still matters
Docstrings should briefly explain:
- what the class or function does
- what it expects
- what it returns or publishes
20.12 Testing Requirements for New Work
Before calling a change “done,” try to satisfy these:
- package still builds
- package tests still pass
- runtime command still works
- topic and frame contracts remain valid
- documentation reflects the new behavior
For Python packages, the existing pytest and ament-based test shape is a good starting point. For C++ packages, build and lint discipline plus runtime validation remain important.
20.13 Review Checklist
Before asking someone else to review a change, check:
- did I break the launch flow
- did I change a topic or frame name
- did I add a new parameter without documenting it
- did I verify the node in a real or simulated run
- did I remove guesswork for the next reader
20.14 Documentation Update Rules
Update the handbook when any of these change:
- default runtime commands
- workspace build order
- package purpose
- topic names
- frame names
- external dependency requirements
- recommended launch flow
The longer documentation lags behind commands, the more painful onboarding becomes.
20.15 From Experiment to Production
A script is ready to move from experiment to standard package behavior when:
- it has a clear runtime purpose
- it uses stable inputs and outputs
- it no longer depends on hidden local assumptions
- it can be launched or run consistently by others
- its parameters are exposed
- its behavior has been validated at runtime
That is the right time to clean names, add tests, and integrate documentation.
20.16 Standards References
Helpful external references:
Chapter 2121. AppendicesAI Formula manual chapter 21.
21.1 Glossary
| Term | Meaning |
|---|---|
| Workspace | A ROS 2 build and source unit containing one or more packages |
| Package | A ROS 2 distribution unit that provides code, launch files, or interfaces |
| Node | A running ROS 2 process or executable instance |
| Topic | A named message channel used for streaming data |
| Launch file | A Python description of how to start one or more nodes together |
| Frame | A coordinate system used in TF |
| Overlay | A workspace sourced on top of another workspace |
| Bring-up | The process of starting the hardware and baseline software stack |
| Teleoperation | Manual control of the platform through an input device |
| Rosbag | A recorded dataset of ROS messages for replay and analysis |
21.2 Acronyms
| Acronym | Meaning |
|---|---|
| ROS 2 | Robot Operating System 2 |
| TF | Transform framework |
| GNSS | Global Navigation Satellite System |
| IMU | Inertial Measurement Unit |
| CAN | Controller Area Network |
| RViz | ROS visualization tool |
| SDK | Software Development Kit |
| QoS | Quality of Service |
| URDF | Unified Robot Description Format |
| YAML | Human-readable configuration format commonly used in ROS |
21.3 Package Catalog
| Package | Workspace | Category | Main Role |
|---|---|---|---|
common_cpp | aiformula | software support | Shared C++ helpers |
common_python | aiformula | software support | Shared Python helpers |
vehicle | aiformula | hardware-related | Vehicle description and static transforms |
vectornav_msgs | aiformula | hardware-related | VectorNav message definitions |
vectornav | aiformula | hardware-related | VectorNav driver |
rear_potentiometer | aiformula | hardware-related | Rear-angle sensing bridge |
motor_controller | aiformula | hardware-related | Command-to-CAN conversion |
odometry_publisher | aiformula | hardware-related | Odometry generation |
launchers | aiformula | software-related | Main launch entry points |
road_detector | aiformula | software-related | Road-mask generation |
lane_line_publisher | aiformula | software-related | Lane extraction and publication |
lane_points | aiformula | software-related | Lane-point processing |
kalman_filter | aiformula | software-related | Lane smoothing variants |
obsticle_avoidence | aiformula | software-related | Obstacle-aware path shaping |
auto_launch | aiformula | software-related | Composed perception launch flow |
data_record | aiformula | software-related | Metrics and run recording |
navigation | aiformula | software-related | Nav2 integration |
simulator | aiformula | software-related | Gazebo launch support |
trajectory_follower | pid_ws | software-related | Sophia controller variants |
21.4 Executable Catalog
| Package | Executable | Typical Use |
|---|---|---|
motor_controller | motor_controller | Normal actuation command path |
motor_controller | motortest | Motor-control testing utility |
rear_potentiometer | rear_potentiometer | Rear-angle sensing node |
road_detector | road_detector | Road segmentation node |
lane_points | lane_0215 | Lane-point processing variant |
lane_points | lane_0529oa | Obstacle-aware lane-point variant |
kalman_filter | kalman0225 | Historical filter variant |
kalman_filter | withoutkalman | Unfiltered processing variant |
kalman_filter | withoutkalman_0312 | Current commonly used smoothing-stage variant |
obsticle_avoidence | b_spline | Obstacle-aware path generation |
odometry_publisher | wheel_odometry_publisher | Wheel-based odometry node |
odometry_publisher | gyro_odometry_publisher | IMU-assisted odometry node |
lane_line_publisher | lane_line_publisher | Lane extraction node |
trajectory_follower | lya_follower_connected_omegat_global | Main lane-following controller |
trajectory_follower | lya_record | Controller-side recording utility |
trajectory_follower | lya_oa | Obstacle-aware controller |
trajectory_follower | lya_follower_fixedpath_record | Fixed-path recording variant |
trajectory_follower | lya_baseline_follower_fixedpath_record | Baseline comparison variant |
21.5 Launch Catalog
| Package | Launch File | Typical Use |
|---|---|---|
launchers | all_nodes.launch.py | Baseline hardware and platform bring-up |
launchers | joy.launch.py | Manual input only |
launchers | teleop.launch.py | Twist generation from a gamepad |
launchers | socket_can_bridge.launch.py | CAN bridge layer |
launchers | vectornav.launch.py | VectorNav launch wrapper |
launchers | zedx_camera.launch.py | ZED camera launch wrapper |
launchers | ournew_zedx_camera.launch.py | Variant camera launch profile |
launchers | our_all_nodes.launch.py | Variant composed baseline profile |
motor_controller | motor_controller.launch.py | Motor-controller node launch |
road_detector | road_detector.launch.py | Road detector launch |
lane_line_publisher | lane_line_publisher.launch.py | Lane extraction launch |
data_record | data_record.launch.py | Metrics and bag recording helper |
odometry_publisher | gyro_odometry_publisher.launch.py | Gyro odometry only |
odometry_publisher | wheel_odometry_publisher.launch.py | Wheel odometry only |
odometry_publisher | wheel_and_gyro_odometry_publishers.launch.py | Combined odometry launch |
rear_potentiometer | rear_potentiometer.launch.py | Rear-angle sensing launch |
vectornav | vectornav.launch.py | Direct VectorNav driver launch |
vehicle | extrinsic_tfstatic_broadcaster.launch.py | Static TF publication |
navigation | aiformula_navigation_launch.py | Nav2 launch profile |
simulator | gazebo_simulator.launch.py | Gazebo simulation profile |
21.6 Command Cheat Sheet
# build baseline workspace
cd <aiformula-workspace>
source /opt/ros/foxy/setup.bash
colcon build --symlink-install
source install/setup.bash
# build controller workspace
cd <pid_ws-workspace>
source /opt/ros/foxy/setup.bash
source <aiformula-workspace>/install/setup.bash
colcon build --symlink-install
source install/setup.bash
# baseline bring-up
./init_sensors.sh
ros2 launch launchers all_nodes.launch.py
# perception stack
ros2 launch auto_launch auto_yolop_launch.py
# lane-following controller
ros2 run trajectory_follower lya_follower_connected_omegat_global
# obstacle-aware flow
ros2 run lane_points lane_0529oa
ros2 run kalman_filter withoutkalman_0312
ros2 run obsticle_avoidence b_spline
ros2 run trajectory_follower lya_oa
# diagnostics
ros2 node list
ros2 topic list -t
ros2 param list
ros2 run tf2_tools view_frames
# testing
colcon test
colcon test-result --verbose21.7 Key Topic Reference
| Topic | Producer Side | Consumer Side |
|---|---|---|
/aiformula_sensing/zed_node/left_image/undistorted | camera stack | road detector |
/aiformula_perception/road_detector/mask_image | road detector | lane-line extraction |
/aiformula_perception/lane_line_publisher/lane_lines/center | lane-line extraction | lane points and controller-side logic |
/aiformula_sensing/gyro_odometry_publisher/odom | odometry publisher | controller nodes |
/aiformula_control/game_pad/cmd_vel | teleop or controller | motor controller |
/aiformula_control/motor_controller/reference_signal | motor controller | CAN sender / vehicle interface |
21.8 Key Frame Reference
| Frame | Used By |
|---|---|
map | navigation-oriented reasoning |
odom | local state estimation |
base_footprint | mobile-base ground reference |
base_link | main body frame |
zed_camera_center | camera-centric transforms |
zed_left_camera_optical_frame | left image interpretation |
zed_right_camera_optical_frame | right image interpretation |
21.9 High-Value Parameter Areas
This is not a full parameter dump. It is the set of parameter categories new developers should expect to touch first.
| Parameter Area | Why It Matters |
|---|---|
| camera launch arguments | affects input availability, image size, and startup mode |
| topic remappings | determines whether nodes actually connect |
| frame IDs | determines TF coherence |
| wheel and vehicle constants | affects odometry and actuation interpretation |
| motor-controller settings | affects command scaling and CAN behavior |
| map and Nav2 settings | affects navigation experiments |
| controller gains and limits | affects tracking behavior |
21.10 Hardware Pre-Run Checklist
- power is available
- required sensors are connected
- the CAN device is recognized
- the camera is connected
- the IMU and GNSS device is connected
- the correct shell environment is active
- the baseline bring-up command has been run
21.11 New Member First-Day Checklist
- build the baseline workspace
- build the controller workspace
- source both in the correct order
- launch the baseline stack
- confirm sensor topics exist
- confirm odometry exists
- run one perception profile
- run one controller profile
- inspect one topic with
ros2 topic echo - inspect one node with
ros2 node info - stop the system cleanly
21.12 FAQ
Why are there two workspaces?
The baseline workspace contains platform and shared system packages. The controller workspace isolates Sophia’s controller-side work so it can evolve without turning the entire runtime into one large overlay.
Should I start with navigation?
No. Start with baseline bring-up and controller visibility. Navigation is useful, but it is not the fastest path to a first successful run.
Should I debug by reading code first?
Usually no. Start with ros2 node list, ros2 topic list -t, ros2 topic echo, and ros2 run tf2_tools view_frames. Runtime inspection is faster.
Why do some packages have tests but still need manual validation?
Because many local tests are lint-oriented. They help maintain code quality, but they do not prove that the hardware-integrated runtime behaves correctly.
When should I trust an experimental script?
Only after you can explain its inputs, outputs, assumptions, and runtime role. If those are unclear, treat it as reference material, not a default workflow.
21.13 Final Reference Set
These links are the most useful external references to keep nearby: